Install Support For Ceiling Fan
Ceiling Fan Installation Instructions. Some pieces of the fan require assembly before hanging. Attach the blades to the blade brackets. In the case of a downrod fan, slip the canopy over the downrod and attach the downrod to the fan. In the case of a close mount (not hugger) fan, attach the canopy directly to the motor.
We have had many requests for installation instructions and/or owner's manuals for certain model ceiling fans. However, in most cases, assembling and installing a fan is very standard. Most fans have very similar parts and therefore are put together in much the same way.
It should be noted that it is recommended the outlet box/and or support be rated for a weight greater than the actual weight of the fan. You also have to factor in the centrifugal force of the rotating blades, and allow for any vibrations, etc. A fan that weighs 25lbs or so is usually recommended to have a support rated for 30-40lbs or more. But in any case, in order to have a legal installation, the fan (and outlet box) should be attached to ceiling joist or rated fan brace. If the outlet box is loose or unsupported you will need to brace it further.
Anyone with a bit of mechanical and electrical aptitude should have no problem installing a fan. However if you are in a situation where there is not already an existing power supply and support, you might want to call a professional if you are not comfortable and knowledgeable working in this area.
Ceiling Fan Installation Instructions
1. Some pieces of the fan require assembly before hanging. Attach the blades to the blade brackets. In the case of a downrod fan, slip the canopy over the downrod and attach the downrod to the fan. In the case of a close mount (not hugger) fan, attach the canopy directly to the motor. In some cases you may want to attach the light fitter (should one apply) to the motor before assembly, in other cases it will be easier to attach once the fan is on the ceiling. Some fans also require the switch housing be plugged in and attached. In any case, at this point the fan should consist of 3 or 4 types of pieces: the motor assembly, the mounting bracket, the blades, and, if applicable, the light attachments.
2. Attach the mounting bracket to the fan brace and/or ceiling outlet box.
3. Hang the motor assembly from the mounting bracket. In some cases this will be via a small hook, in other cases the ball on the end of the downrod will fit directly in the bracket. Be sure the groove in the ball lines up with the tab in the bracket and/or canopy.
4. Connect the wires. Refer to the Ceiling Fan Wiring Guide for more information.
5. Attach the canopy to the mounting bracket. In the case of some fans this may be 2 thumbscrews on the bottom, others may have as many as four screws on the side. In close-mount fans and some downrod fans the canopy is load bearing, in other cases it is purely decorative. In downrod fans be sure the ball is (still) lined up with the tab in the bracket/canopy. If the canopy has a decorative ring to cover the screws, attach that.
5a. For hugger fans, attach the motor to the mounting bracket, in most cases with four locknuts (some fans may vary). Attach the motor housing cover to the mounting bracket (usually with four screws).
6. Attach the blades to the motor via the blade brackets. Each blade bracket uses two screws which fit directly to the motor or the flywheel.
7. Attach the light fitter, if applicable and if it has not already been attached. Attach the glass to the light kit, and any other decorative accessories the fan may include.
Pass & Seymour Ceiling Fan Installation Kit
Reiker Fansafe Ceiling Fan Installation Kit
Hampton Bay Ceiling Fans, Installation Owners Manual, Model: The Gazebo
Hunter Ceiling Fans, Installation Owners Operation Guide Manual
Minka Aire Artemis 58 in. Indoor Ceiling Fan
Capistrano Gallery 52-Inch 5-Blade 4-Light Ceiling Fan
Westinghouse Ceiling Fan with J-Hook Installation System
Westinghouse Saf-T-Grid for Suspended Ceilings
Ceiling Fan Installation - Help & Support Frequently Asked Questions (Faqs)
- What is the going rate to have a ceiling fan installed, uninstalled or removed from my home?
So, what should it cost to have a ceiling fan installed, or removed from the home? This frequently asked question is answered here, so you get an idea of the cost of installing or removing a ceiling fan from your home.
- How to Install a Ceiling Fan
How do I install my ceiling fan? I need help installing my ceiling fan, what should I do? I can't find the manual for my ceiling fan and need help to install it. What should I do? These questions answered and more.
Is this helpful?
:max_bytes(150000):strip_icc()/ExposedWallStuds-a63fcebbc3414a23918706ee2b45cc72.jpg "Ceiling")
How to Install a Ceiling Fan
By Matt Weber
A ceiling fan can be a stylish and effective way to enhance airflow throughout a room. Unlike swapping one light fixture for another light fixture, however, a ceiling fan requires special mounting accommodations to support its weight and movement.
A ceiling fan requires a metal ETL-listed mounting box, and if there is not one already in place, then one must be installed before hanging the fan. The fan’s outlet box must be secured directly to the building framing with the appropriate fasteners to provide sufficient reinforcement to support the moving weight of the fan (at least 50 lbs.).
Never mount a fan using a plastic outlet box. The fan could feasibly tear out of the plastic mounting and fall onto whoever or whatever happens to be beneath it.
In this article I show the steps to install the Kichler Décor Innes II ceiling fan. Although assembly will vary among different models of fans, the mounting procedure is basically the same for all ceiling-mounted units.
Installation
Begin by shutting off power to the ceiling fixture at the electrical service panel. After removing the old light fixture and disconnecting the wires, I had to deal with an old plastic ceiling box that was not rated for the fan.
It’s a good idea to label your wires for reconnection, because once you remove all the wire nuts, you may have a tangle of wires like this to sort through.
Removing the old light fixture, I discovered the old plastic ceiling box was not suitable to mount the new fan.
To dislodge the plastic box, cut away any caulk or paint around the rim, try to remove the screws or nails and pry it out. This didn’t work in my case, and I had to venture into the attic to pry some nails out of a ceiling joist to remove the old box.
The plastic box was nailed to the framing, so I had to pry it loose.
Inside the attic I found the old outlet box buried beneath loose insulation attached to the side of a ceiling joist.
The good news about the ceiling joist is that it provided a solid framing member on which to secure the new ETL-listed fan box. You’ll find the appropriate metal boxes prominently listed as “fan-rated” on the packaging at your local home center. The one I used came with a 90-degree bracket for screwing into the side of the joist.
In my situation, I attached the fan box to the side of the joist using heavy-duty R4 screws from GRK fasteners.
The new metal ceiling fan box came with a right-angle bracket for mounting from the side.
To hang your fan where there is an existing fixture but no ceiling joist, you can install 2x blocking between ceiling joists or alongside a ceiling joist, and then mount the fan box to the blocking. Or, you may need to install a joist hanger bar as shown in Fig. 3.
If the box is not situated beneath or adjacent to a ceiling joist, then you’ll need to make other accommodations to mount it securely. If you have access to the ceiling joists, you can install 2x blocking between the joists and then screw the fan box into the blocking.
To hide some ceiling damage around the fixture box, I installed a decorative ceiling medallion with a couple of trim-head screws driven into the ceiling joist. The medallion is an accessory trim piece available at most home centers that sell fans.
Route the wires through the punch-out holes in the fan box.
Because I forgot to label the wires, we had to use a multi-meter to test the cables to determine how to hook them back up correctly. Save yourself some hassle and learn from my mistake.
Models vary, so it’s important to refer to your fan manufacturer’s instructions for assembling your specific fan. Typically, assembly begins with a mounting bracket that fastens into the metal box.
Our recovery disk supports x86 and x64 platforms and all Microsoft Windows 7 editions, including 32-bit and 64-bit editions: Ultimate, Enterprise, Professional, Home Premium, Home Basic and Starter. Easy Recovery Essentials (or EasyRE), is a 55 to 135 MiB ISO image ready to be downloaded. You can burn this ISO image to any CDs, DVDs or USB drives and boot from it to recover or repair your.  Data recovery for windows 7 64 bit free download - 7-Zip (64-bit), Windows 7 (Professional), LiteSpeed 64 bit, and many more programs. Windows 7 64bit Data Recovery Step by Step. NTFS / FAT Partition Recovery Software Free Download for Windows 7 64 bit. NTFS and FAT are two common file systems on Windows 7 64bit computer. When you want to recover data from Windows 7 64bit partition, you may need to recover files from an NTFS partition or FAT partition.
Connect the electrical wires to the fan body according to the instructions included with your fan.
The next step is to install the motor body. Fan manufacturers usually provide a safety wire or mounting bracket that can hold the motor body in position while you work.
If your fan includes a light fixture it’s usually the last component to be installed.
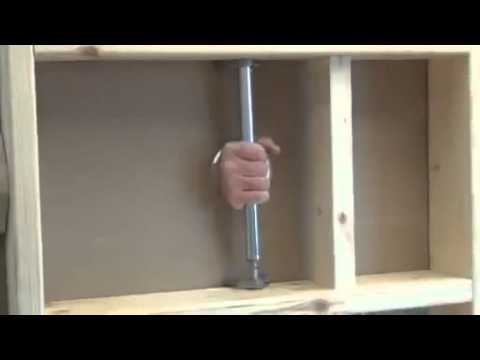
If the fixture is situated between two joists and you can’t access the joists from above, then you can install a metal brace called a “ceiling fan brace” or “joist hanger bar”. Available at most home centers, the brace can be inserted through the hole in the ceiling. Once positioned between the joists, the brace expands to contact the framing on each side. The fan box mounts onto the brace. Make sure the brace is centered in the hole and at the proper elevation so the fan box will be flush with the ceiling, then use a wrench or pliers to tighten the brace until secure.
In addition to its sleek, contemporary design, the Kichler Innes II fan includes a remote control with a dimmer feature for the light, three fan speeds and a motor that operates silently.
Other DIY Articles